
Notice
Recent Posts
Recent Comments
Link
| 일 | 월 | 화 | 수 | 목 | 금 | 토 |
|---|---|---|---|---|---|---|
| 1 | 2 | 3 | 4 | 5 | 6 | |
| 7 | 8 | 9 | 10 | 11 | 12 | 13 |
| 14 | 15 | 16 | 17 | 18 | 19 | 20 |
| 21 | 22 | 23 | 24 | 25 | 26 | 27 |
| 28 | 29 | 30 | 31 |
Tags
- apollo
- android 오류
- 군대에서 안드로이드 개발
- log
- Di
- Rest
- Compose
- interface
- 오류
- DataBinding
- RETROFIT
- 군대 개발
- text
- android studio cloud
- Log잘림
- Status Bar
- 군대 github
- 네트워크
- okhttp
- BindingAdapter
- 디버깅 오류
- Encoding
- 뷰 겹침
- Android
- 군대개발
- kotlin
- multipart
- intArray
- 군대 깃허브
- REST API
Archives
- Today
- Total
KDY
Android BindingAdapter 본문
안녕하세요 이번에 포스팅할 내용은 BindingAdapter입니다.
들어가기에 앞서 DataBinding이 선행되어 있어야 함을 알립니다.
https://yeongdae-coding.tistory.com/8
BindingAdapter란?
<TextView
        android:layout_width="wrap_content"
        android:layout_height="wrap_content"
        android:text="Hello World!"
        app:layout_constraintBottom_toBottomOf="parent"
        app:layout_constraintEnd_toEndOf="parent"
        app:layout_constraintStart_toStartOf="parent"
        app:layout_constraintTop_toTopOf="parent" />
LayoutView에는 여러가지 속성들이 있습니다.
하지만 이러한 속성들 중에서 자신이 원하는 기능이 없을수도 있습니다.
그럼 acitivity처럼 원하는 메서드를 따로 만들어서 사용할수는 없을까요?
아니요. 그때 사용하는게 오늘 알려드릴 BindingAdapter 입니다.
사용방법
먼저 BindingAdapter Class를 만들어 줍니다.
object BindingAdapter {

    @JvmStatic
    @BindingAdapter("setText")
    fun changeText(view:TextView,text: String){
        view.text = text
    }

}- object: Binding Adapter는 메모리상에 올려서 사용해야 하기 때문에 Object로 생성한다.
- @JvmStatic: 전역 변수의 Getter Setter를 정적 함수로 설정하는 어노테이션이다.
- @BindingAdapter: 괄호 안에 원하는 메서드 이름을 지어주면 됩니다. -> 여기서 정하는 메서드 이름이 Layout에서 사용하는 메서드 이름 입니다.
- changeText: 이 메서드 이름도 원하는 걸로 정해주면 됩니다. 텍스트 뷰를 수정하는 기본 메서드 이름이 changeText라고 해서 꼭 그걸 따라 사용하지 않아도 됩니다.
changeText()의 view부분은 사용할려는 View를 넣어 주면 됩니다. text 부분은 변경할려는 값을 받는 매개변수 입니다.
위의 예제는 TextView를 변경할 예정이라 TextView를 넣어 줬습니다.
Layout
<?xml version="1.0" encoding="utf-8"?>
<layout xmlns:android="http://schemas.android.com/apk/res/android"
    xmlns:app="http://schemas.android.com/apk/res-auto"
    xmlns:tools="http://schemas.android.com/tools">

    <data>
        <variable
            name="activity"
            type="org.gsm.postingproject.bindingadapter.BindingActivity" />
    </data>

    <androidx.constraintlayout.widget.ConstraintLayout
        android:layout_width="match_parent"
        android:layout_height="match_parent"
        tools:context=".bindingadapter.BindingActivity">

        <TextView
            android:layout_width="wrap_content"
            android:layout_height="wrap_content"
            android:textSize="30sp"
            android:text="Hello World"
            setText="@{activity.text}" //BindigAdapter로 지정한 setText로 접근 합니다.
            app:layout_constraintStart_toStartOf="parent"
            app:layout_constraintEnd_toEndOf="parent"
            app:layout_constraintTop_toTopOf="parent"
            app:layout_constraintBottom_toBottomOf="parent"
            />

    </androidx.constraintlayout.widget.ConstraintLayout>
</layout>
Activity
class BindingActivity : AppCompatActivity() {
private val binding by lazy { ActivityBindingBinding.inflate(layoutInflater) }
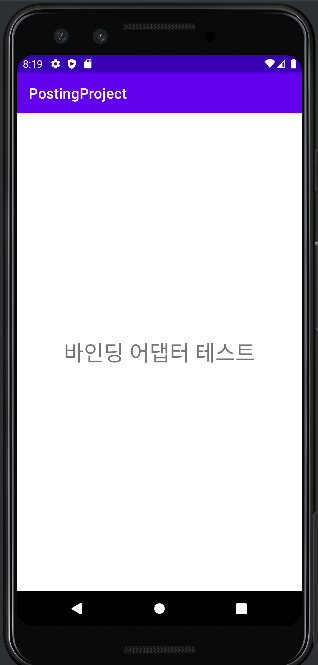
var text = "바인딩 어댑터 테스트"
override fun onCreate(savedInstanceState: Bundle?) {
super.onCreate(savedInstanceState)
setContentView(binding.root)
binding.activity = this
}
}
실행 화면
그럼 변수 2개를 받을순 없을까요?
가능합니다. 방법은 간단 합니다.
BindingAdapter Class를 아래와 같이 변경해 줍니다.
object BindingAdapter {

    @JvmStatic
    @BindingAdapter("setText", "setGrade")
    fun changeText(view: TextView, text: String, grade: Int) {
        view.text = "$text | $grade"
    }

}
BindingAdapter의 메서드를 하나더 추가해 주시면 됩니다.
Activity
class BindingActivity : AppCompatActivity() {
private val binding by lazy { ActivityBindingBinding.inflate(layoutInflater) }
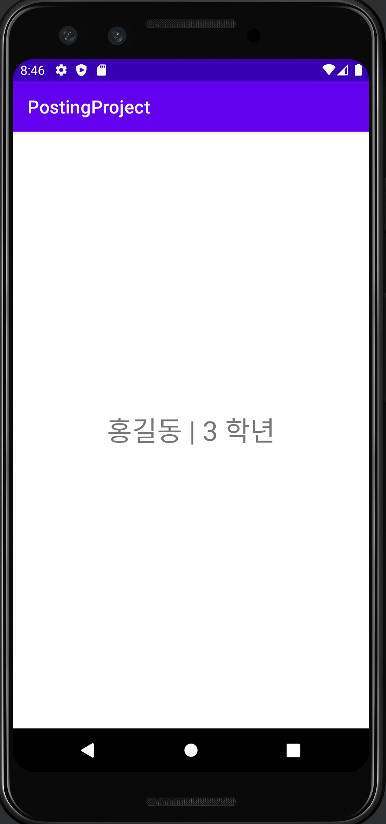
var text = "홍길동"
var grade = 3
override fun onCreate(savedInstanceState: Bundle?) {
super.onCreate(savedInstanceState)
setContentView(binding.root)
binding.activity = this
}
}
Layout
<?xml version="1.0" encoding="utf-8"?>
<layout xmlns:android="http://schemas.android.com/apk/res/android"
    xmlns:app="http://schemas.android.com/apk/res-auto"
    xmlns:tools="http://schemas.android.com/tools">

    <data>
        <variable
            name="activity"
            type="org.gsm.postingproject.bindingadapter.BindingActivity" />
    </data>

    <androidx.constraintlayout.widget.ConstraintLayout
        android:layout_width="match_parent"
        android:layout_height="match_parent"
        tools:context=".bindingadapter.BindingActivity">

        <TextView
            android:layout_width="wrap_content"
            android:layout_height="wrap_content"
            android:textSize="30sp"
            android:text="Hello World"
            setText="@{activity.text}"
            setGrade="@{activity.grade}" //2번째 메서드를 사용하여 데이터를 넣어 주시면 됩니다.
            app:layout_constraintStart_toStartOf="parent"
            app:layout_constraintEnd_toEndOf="parent"
            app:layout_constraintTop_toTopOf="parent"
            app:layout_constraintBottom_toBottomOf="parent"
            />

    </androidx.constraintlayout.widget.ConstraintLayout>
</layout>
실행 화면
이상 포스팅을 마치겠습니다.
다음에는 ListAdapter도 같이 사용하는 방법을 알아보겠습니다.
전체 코드
'Android' 카테고리의 다른 글
| Android Compose Text (0) | 2025.05.23 |
|---|---|
| 군대에서 안드로이드 개발하기 (0) | 2025.05.21 |
| Android Okhttp Logging Multipart 무시하기 (0) | 2022.09.30 |
| Android DataBinding (0) | 2022.05.02 |
| Android dp와sp의 차이 (0) | 2022.04.29 |
'Android' Related Articles
more


